Sales Screen
Point of Service > Sales
The Sales Screen is a record of all transactions that have occurred in TITAN.
-
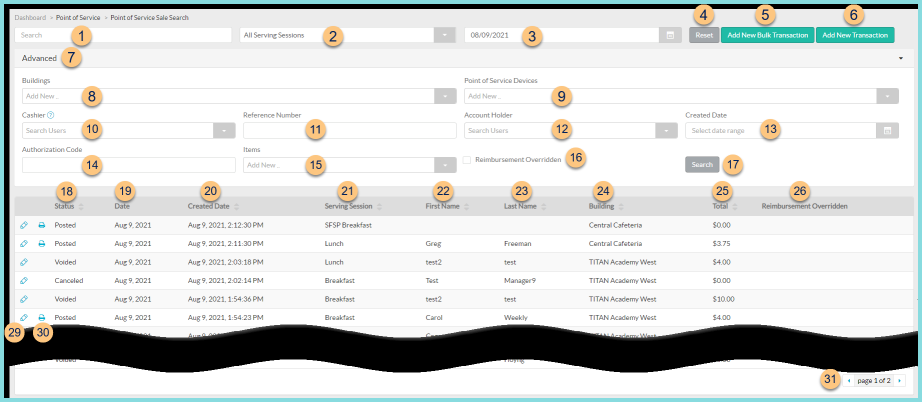
Search - search by name
-
All Serving Sessions - filter by serving session
-
Date - select a date (default: Today)
-
Reset - click to reset search parameters
-
Add New Bulk Transaction - click to add a bulk transaction
-
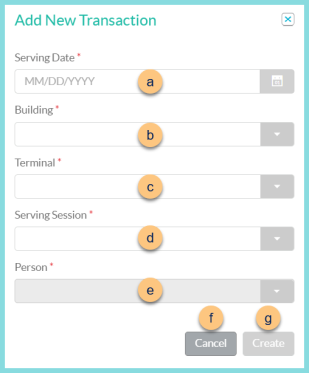
Add New Transaction - click to add a new transaction
-
Serving Date - select the serving date
-
Building - select the serving building
-
Terminal - select the device
-
Serving Session - select the serving session
-
Person - select the student or staff member
-
Cancel - click to return to the previous screen without creating the transaction
-
Save - click to be redirected to the back office transaction screen
-
Advanced - click to open additional filters
-
Buildings - filter by cafeteria(s)
-
Point of Service Devices - filter by device(s)
-
Cashier - filter by user(s)
-
Reference Number - search by reference number
-
Account Holder - filter by account holder(s)
-
Created Date - filter by created date range
-
Authorization Code - search by authorization code
-
Items - filter by sales item(s)
-
Reimbursement Overridden - check to filter for transactions with reimbursement overridden status
-
Search - click to apply advanced filters
-
Status - click to sort by status
-
Date - notice the transaction effective date
-
Created Date - click to sort by the transaction created date and time
-
Serving Session - click to sort by serving session
-
First Name - click to sort by person first name
-
Last Name - click to sort by person last name
-
Building - click to sort by Cafeteria
-
Total - click to sort by transaction total
-
Reimbursement Overridden - notice the reimbursement overridden status (Checked = True, Blank = False)Printer Icon - click to generate a transaction receipt report
-
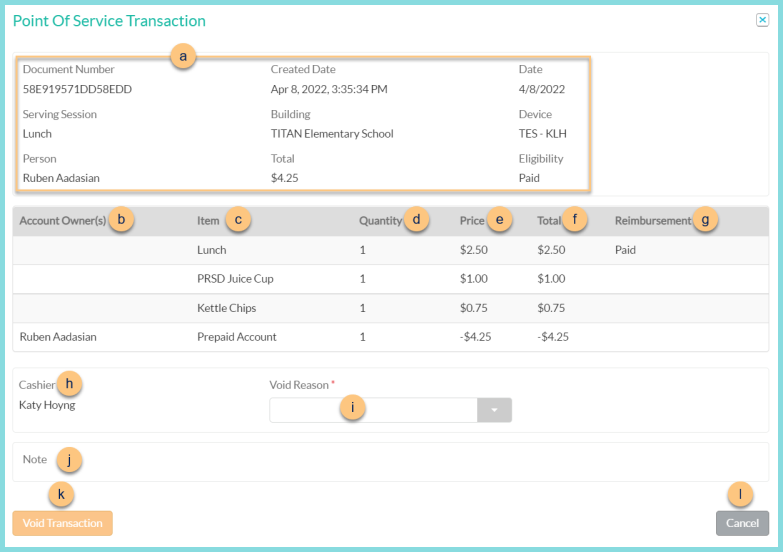
Pencil - click to view or void transaction details
-
Notice the Document Number, Created Date and time, effective Date, Serving Session, transaction Building, Device, Person ( staff, student, or building account), Total, and Eligibility.
-
Account Owner(s) - notice the account owner(s)
-
Item - notice the sales item(s) and payment item(s)
-
Quantity - notice the quantity of each item
-
Price - notice the dollar amount per item
-
Total = d x e
-
Reimbursement - notice the transaction reimbursement
-
Cashier - notice the user's name
-
Void Reason - select a void reason if transaction is to be voided
-
Note - notice any notes if entered on a (+) Account Transaction
-
Void Transaction - click to void the transaction. A void reason must be selected (Step i) if void reasons are required.
-
Close - click to return to the previous screen without voiding
-
< > - click to scroll through pages